In the world of livestreaming, a logo isn’t just a simple graphic; it represents your stream’s identity, helping you stand out from the crowd. Your livestream logo is often the first thing your audience will notice, and it can set the tone for how they perceive your stream. Whether you’re a professional gamer, an online instructor, or a casual broadcaster, a 3D logo for livestream plays a crucial role in building brand recognition.
While 2D logos serve their purpose, many streamers are now looking to create more dynamic and attention-grabbing logos by adding a third dimension. A 3D logo for livestreams is far more than just a trendy aesthetic; it has practical benefits. It brings depth, richness, and a more professional appearance to your branding.
In this guide, we will show you how to turn your standard 2D logo into a 3D logo for livestreams that not only enhances your stream’s visual appeal but also engages your viewers in a more impactful way.
Why give that extra touch to your Livestream Logo?
The idea of adding a third dimension to your livestream logo might seem unnecessary if your 2D logo works well enough. But think about it: a 3D logo stands out more and attracts attention, which is exactly what you need in the competitive world of livestreaming. Let’s explore the core reasons why making your logo 3D can elevate your stream:
- Increased Visibility:
The primary reason for transforming your 2D logo into a 3D one is the visual impact it creates. A 3D logo for livestreams will pop on screen, grabbing your audience’s attention. Unlike a static 2D logo, a 3D logo has depth, which gives it a more dynamic presence during broadcasts. - Enhanced Professionalism:
Viewers are more likely to engage with your content if they see a polished and professional logo. As a streamer, establishing a professional brand identity is key to building credibility and trust with your audience. - Animation Opportunities:
A 3D logo for livestreams opens a world of animation possibilities. You can animate the logo to spin, rotate, or even have it interact with other on-screen elements during your stream. This can create a more visually appealing experience for your viewers, making them more likely to stay engaged and follow your content. - Brand Recognition:
With a livestream logo, you are building recognition. Viewers who see a well-designed logo, especially one with 3D features, are more likely to remember your stream and associate it with your specific brand or personality. A memorable logo can help set your stream apart from the thousands of others online.
Turning Your 2D Logo into a 3D Logo for livestream
Now that you understand the importance of a 3D logo for livestreams, let’s start transforming your 2D logo into a dynamic 3D one.
Before we dive into the steps, let’s mention a tool that makes the journey smoother — WASP3D Xpress.
Xpress is a free and intuitive solution made for livestreamers. It helps you create professional-looking graphics without complicated design software. Whether you want to extrude a 2D logo, add textures, or create animations, Xpress has all essential features.
It helps bring your vision to life — easily and effectively. It gives you the right tools, while keeping full control in your hands.
Step 1: Start with a Basic 2D Logo
The foundation of any livestream logo starts with a 2D design. You can use vector-based shapes such as circles, squares, and polygons, or simply import your existing logo that you’ve created previously. The goal here is to create a simple yet effective design that can be easily extruded into 3D.
- Design Tip: Keep the logo design clean and minimalistic. Overcomplicating the design will only make the extruded result more challenging to work with.
Step 2: Use Extrusion to Add Depth
Extruding is the process of turning your 2D logo into a 3D object by adding depth to it. This gives your livestream logo the thickness and dimension that makes it visually striking.
- Extrusion Tip: The depth (or extrusion amount) defines how far the logo extends in 3D space. Start with a basic depth and adjust according to the style and impact you want to achieve. For example, a deeper extrusion will make your logo appear more prominent, while a shallower extrusion can create a subtle, flat look.
Step 3: Adjust Segments for Smoother Edges
To ensure that your 3D logo for livestreams looks polished, you’ll need to adjust the segments, both radial and height. These segments define the number of line segments that form the curves and surfaces of the logo.
- Segment Adjustment Tip: More segments result in smoother curves and better-looking edges. However, too many segments can slow down your render time, so it’s essential to find a balance between visual quality and performance.
Step 4: Smoothing the Logo
In this step, you will smooth the edges of your livestream logo to make it look more refined. This is done by adjusting the smoothing angle, which defines how the surfaces of the logo transition between each other.
- Smoothing Tip: The smoother the logo, the better it will look in motion, especially when animated. You’ll also want to ensure there are no sharp edges, as these can be distracting during a livestream.
Step 5: Adding Caps to Your 3D Logo
Caps are flat surfaces that can be added to the top and bottom of your livestream logo. This is an important step when transforming a 2D logo into a 3D design. It gives the logo a more cohesive, finished appearance. Caps help seal the 3D shape and make it look more like a solid object rather than just an extruded shape.
- Top Cap and Bottom Cap: These caps can be generated for both the top and bottom of the extruded logo, giving the design a more solid, closed appearance. You can choose whether you want to keep these caps visible based on the visual style of your livestream logo.
- Tip for Better Visual Appeal: Experiment with the top and bottom caps to see how they affect the overall look. If your livestream logo needs to feel more like a physical object, adding these caps will give it more dimension and help it stand out during your streams.
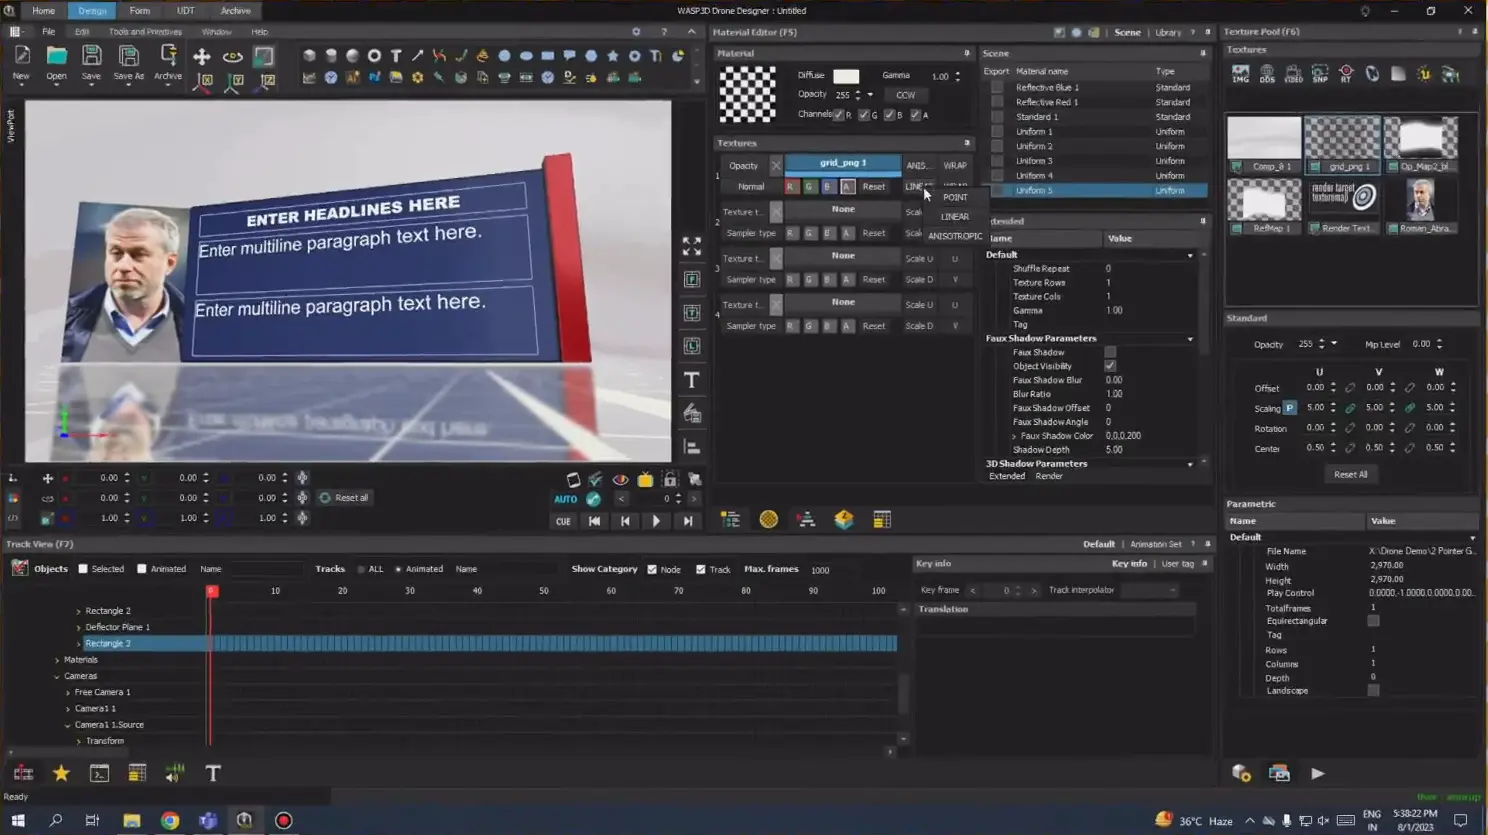
Step 6: Applying Texture to Your Livestream Logo
Now that you have your basic 3D livestream logo, it’s time to apply some texture to it. Adding texture to your logo is essential in making it look more realistic and polished. It can be a simple material, or you can import textures from a library. Textures can give your logo depth, character, and the kind of detail that helps it pop on screen.
- Texture Pool: The texture pool in your 3D software allows you to browse and apply a range of textures to your livestream logo. Whether you choose metallic, fabric, or abstract patterns, textures will make your logo more engaging.
- Material Pool: After selecting a texture, you will add it to your material pool and adjust the UV settings. UV mapping ensures that the texture aligns with the shape of your livestream logo accurately, so it doesn’t look distorted when applied.
- Texture Tip: It’s essential to balance the texture’s complexity with the performance needs of your stream. While a highly detailed texture can look stunning, it could also increase the load on your system, potentially affecting the quality of your stream.
Animating a 3D logo for your Livestream
Adding animation to your livestream logo can significantly enhance the visual appeal of your stream. Animation brings life to your logo and can make it interact with other elements on-screen. Whether it’s spinning, rotating, or transitioning in and out, animations help draw viewers’ attention and keep them engaged.
- How to Animate Your Logo: By using auto-keyframe animation, you can animate the vertices of your logo. This allows you to move individual parts of your livestream logo to create fluid transitions. This is particularly useful for adding an animated intro or outro to your stream branding.
- Animation Tip: Experiment with different animation speeds and transitions. Too fast, and your logo might appear jarring; too slow, and it may lose its impact. Aim for smooth, balanced animation that complements the pace of your stream.
Why use a free livestream graphics software, Xpress?
You can design and animate a livestream logo using various 3D modeling software. However, Wasp3D Xpress offers a powerful and free solution. Create high-quality, dynamic logos and other livestream graphics without breaking the bank.
Wasp3D Xpress covers everything—from extruding shapes to texturing and animating logos.
It helps enhance your brand with minimal effort. Want a rotating 3D logo or an interactive intro? Wasp3D Xpress has the tools to bring your ideas to life. Download here
This free software simplifies complex 3D design tasks and ensures that your livestream logo is always on point. It’s optimized for real-time streaming.
You can focus on your content while the logo works seamlessly in the background. If you’re looking for an all-in-one solution for creating high-quality livestream logos, Wasp3D Xpress is an excellent choice.
Conclusion
Transforming your livestream logo from 2D to 3D doesn’t have to be a daunting task. With the right tools and techniques, you can create a logo that enhances your brand’s identity and captivates your audience.
Follow the steps outlined above to start designing a 3D logo. Your logo will look visually impactful and professionally executed.
Take your stream’s branding to the next level by integrating Wasp3D Xpress into your workflow. This free software provides every feature you need. Create stunning logos, animations, and graphics with it. Set your stream apart from the rest.
Ready to give your stream a professional edge? Start designing your livestream logo with Wasp3D Xpress today.
FAQs
1. Why should I use a 3D logo for livestreams on YouTube Live or Facebook Live?
A 3D logo for livestreams helps your stream stand out visually on platforms like YouTube Live and Facebook Live. Unlike a flat 2D logo, a 3D logo adds depth and a stronger visual presence on screen. This makes your branding more noticeable and helps viewers recognize your stream more easily during broadcasts.
2. Can a 2D logo be converted into a 3D logo for livestreams?
Yes, a simple 2D logo can easily be transformed into a 3D logo for livestreams. The process usually starts with a basic 2D design, which is then extruded to add depth. After that, adjustments like smoothing, adding caps, and applying textures help make the logo look more polished for use in livestreams on platforms like YouTube Live and Facebook Live.
3. What steps are involved in creating a 3D logo for livestreams used on YouTube Live and Facebook Live?
Creating a 3D logo for livestreams usually begins with a simple 2D logo. The design is then extruded to add depth and give it a three-dimensional appearance. After that, adjustments like segment settings help smooth the edges, while caps can be added to close the top and bottom surfaces. Finally, textures and materials can be applied to make the logo look more polished for livestreams on platforms like YouTube Live and Facebook Live.
4. Why are textures important in a 3D logo for livestreams on YouTube Live and Facebook Live?
Textures play an important role in making a 3D logo for livestreams look more realistic and visually appealing. By applying materials or textures, the logo gains more detail and character instead of appearing like a plain extruded shape. When used during livestreams on YouTube Live or Facebook Live, textured logos can appear more polished and help improve the overall visual presentation of the stream.
5. Can free software help create a 3D logo for livestreams used on YouTube Live or Facebook Live?